How to Build a Home Flight Simulator - Step by Step illustrated instructions
I have been flying simulators for many years but they didn't really look the part or feel as real as possible......so now is the time to grasp the nettle and build a REAL simulator.
I currently use X-Plane 11 which I have found to be the most realistic flying experience to date, but I am aware that others are catching up quickly and I suspect at some stage I will buy one or two of the others as well......watch this space.


I decided at a late stage in the build to fit doors so that the sim would be totally enclosed.


These are the two side panels, both covered in carpet.


This is the door, also covered in carpet.
I fixed the side panels, made up a door frame and also covered that in carpet. I then fitted the door.


The above is the setup with the old instruments, I have now fitted a set of full helicopter controls on the right hand side of the flight deck. I have also fitted a string of LED lights under the instrument panel to illuminate the panel and flight deck.


Now to the final fit of instruments....


As you will see above, I've fitted 4 iPads, all bought as refurbished items to keep the cost low. I retained the Saitek TPM, but fitted the Fuel, Landing Gear, Trim Panel, Flap Panel and Brake unit (which you can just see under the TPM), from a company called Desktop Aviator in the USA.
The Apps for the iPads are:
Air Navigation Pro - which I have downloaded all of my local aeronautical maps onto.
Remote Flight - for my analogue instruments and also helicopter instruments.
Simionic - for my PFD & MFD panels.
All the iPads work through my home wireless system which frees up USB ports for the other instruments.
I have two HD screens on either side of the sim and a large 65 inch curved 4K screen at the front. With the doors closed this totally immerses me in the sim. Friends who have flown it have said how realistic it is, even to the point of feeling the turns.
I have also fitted aviation headsets, which work perfectly through the sim.


The hardest part was setting the sim up so that it looked as realistic as possible through the windows/screens. This took a considerable amount of time to get right, but I'm very pleased with the final result.
It has been a very enjoyable project, and one that has allowed me to build a sim that will last for years, may evolve as and when new technology arrives, but at the moment its exactly what I hoped for and more....
Happy building.
Now, where's my headset....I can feel a flight coming on....
My aim is to build one as cheaply as possible, but as authentic as possible within the realms of the simulation world.
I won't provide any measurements or material specifications because you will all have your own ideas. I'll just run you through how I built one with photo's at each stage.
All parts are being either bolted, screwed or bracketed together so that if some time in the future it needs to be disassembled, I will be able to do so and reassemble where necessary.
My simulator is a hybrid with fixed wing controls on the left and helicopter controls on the right. However, the early photo's below show dual fixed wing controls. These were later changed.
I currently use X-Plane 11 which I have found to be the most realistic flying experience to date, but I am aware that others are catching up quickly and I suspect at some stage I will buy one or two of the others as well......watch this space.
Let's get building.....
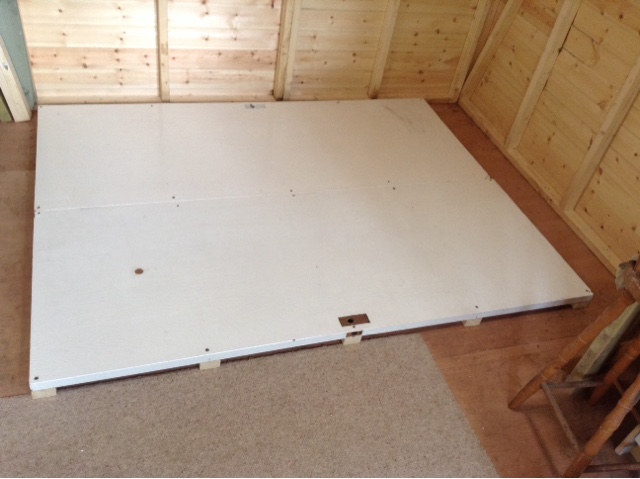
The Base:
The base comprises of two re-claimed doors joined together. They form a very strong base. I covered this with sheets of MDF to level it off and then bought some very cheap carpet and covered the whole of the top of the base with the carpet. I also tucked it under the base to make it easier to move around.
I did consider using wheels, but mine will be built in a workshop with an elevated plywood floor, and I thought that wheels may leave dents in the floor, so decided against this course of action.
As you will see from the photo's, it's a very basic structure.
The next stage will be to fit the seats and rudder pedals to enable me to decide how to design the side panels and place locations for the windows, flight panel etc....
I've just added handles to the side of the base for ease of movement and convenience.
Seats & Pedals:
The seats were bought cheaply off EBay. I already had the pedals so it was just a matter of putting it all together and ensuring that it all aligned correctly.
I had to make up four seat bearers because the seats were to low. I then covered them in left over carpet from the base and fixed them to the floor with right angle brackets.
Once put together it's all taking shape...
I had to ensure that the seats and pedals were in the correct position because the rest of the build hinges around this area. It was a case of measuring at least 3 or 4 times before committing screws and brackets to this part of the build.
I had to ensure that the seats and pedals were in the correct position because the rest of the build hinges around this area. It was a case of measuring at least 3 or 4 times before committing screws and brackets to this part of the build.
I used seats on adjustable runners to cater for all shapes and sizes that may wish to try the sim.
I think you will agree, it's taking shape very nicely.
The side panels:
I made up a frame and covered them in MDF. The bottom section interior has been covered in carpet, and the top section when completed will be covered in perforated head lining material. This has two advantages, it looks good and also provides some sound proofing.
I then made up the panel that fits under the instrument panel, which was also covered in carpet.
Now comes the good bit....
The instrument panel.....
This will vey much be a personal preference thing. The photo's say it all for mine which will be subject to change as the project progresses.
Upper side panels:
These were also cut from MDF and will be fitted once I have fitted the perforated head lining to the inside. The Windows will be replaced with two 32inch HD TV screens which will provide the side views. All will become clear as we progress.
Sides:
The sides are now completed to the profile I liked. I used some left over pieces of wood and braced them so as not to have too much waste.
The Roof...
I've now completed the roof as you will see from the photo's. It's basically a wood frame covered with MDF, and then covered on the interior with car head lining material.
As you will see I have braced the sides with MDF triangles to limit lateral movement.
The Instrument panel.....
I cut the instrument panel to suit my sim and location of instruments. This was a case of dry fitting and removing several times to make sure it all fitted as I had planned. I then sealed the MDF and then sprayed the panel with a Matt grey paint.
Following that I dry fitted some of my instruments and then built the top panel glare shield and covered it in a faux leather material.
This was then fitted to the main cockpit to ensure it fitted correctly.
As you will see below, it's slowly all coming together.


I decided at a late stage in the build to fit doors so that the sim would be totally enclosed.


These are the two side panels, both covered in carpet.


I fixed the side panels, made up a door frame and also covered that in carpet. I then fitted the door.


This is what it looks like so far in the build...


The above is the setup with the old instruments, I have now fitted a set of full helicopter controls on the right hand side of the flight deck. I have also fitted a string of LED lights under the instrument panel to illuminate the panel and flight deck.


As you will see above, I've fitted 4 iPads, all bought as refurbished items to keep the cost low. I retained the Saitek TPM, but fitted the Fuel, Landing Gear, Trim Panel, Flap Panel and Brake unit (which you can just see under the TPM), from a company called Desktop Aviator in the USA.
The Apps for the iPads are:
Air Navigation Pro - which I have downloaded all of my local aeronautical maps onto.
Remote Flight - for my analogue instruments and also helicopter instruments.
Simionic - for my PFD & MFD panels.
All the iPads work through my home wireless system which frees up USB ports for the other instruments.
I have two HD screens on either side of the sim and a large 65 inch curved 4K screen at the front. With the doors closed this totally immerses me in the sim. Friends who have flown it have said how realistic it is, even to the point of feeling the turns.
I have also fitted aviation headsets, which work perfectly through the sim.


The hardest part was setting the sim up so that it looked as realistic as possible through the windows/screens. This took a considerable amount of time to get right, but I'm very pleased with the final result.
It has been a very enjoyable project, and one that has allowed me to build a sim that will last for years, may evolve as and when new technology arrives, but at the moment its exactly what I hoped for and more....
Happy building.
Now, where's my headset....I can feel a flight coming on....
Comments
Post a Comment