Nearly there...
Getting really excited now....
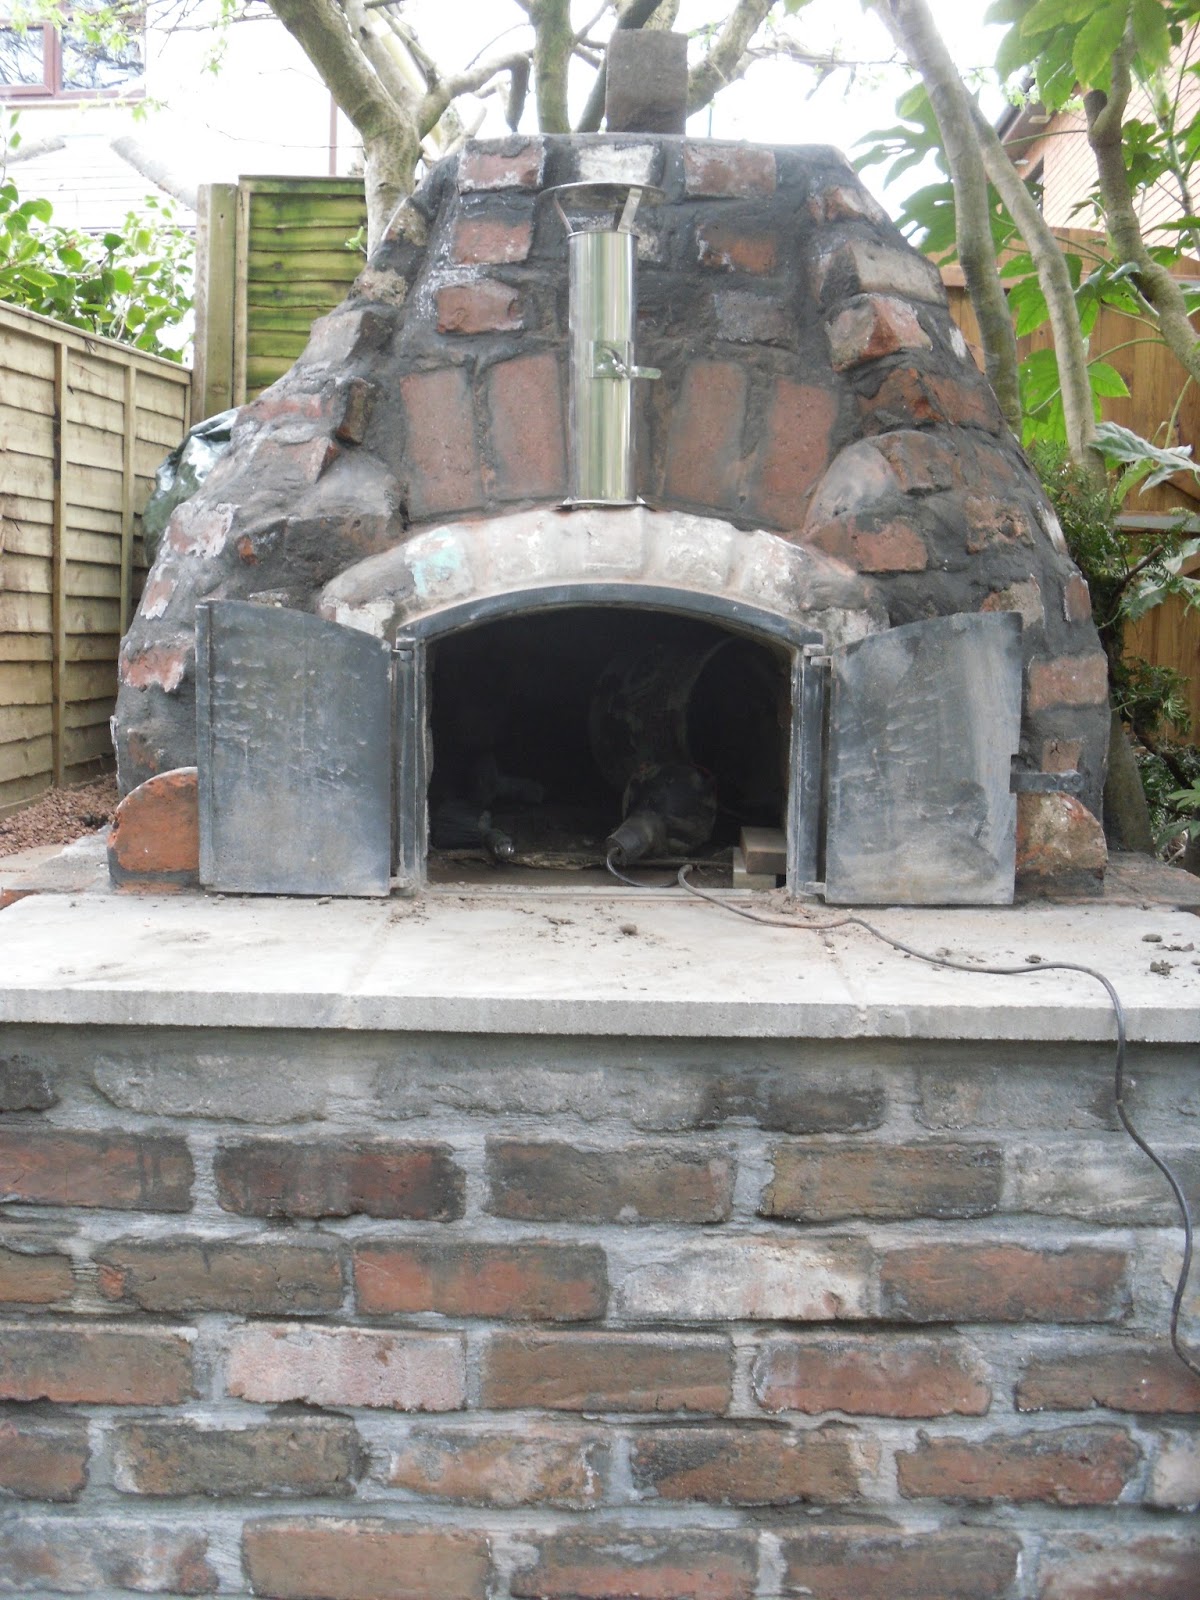
I spent one day building the outer dome out of a combination of whole and half bricks. Much easier when you've got something to work against like the inner dome.
The following day I spent pointing....roughly....in fact very roughly to give it that weatherd, lived in look. The hardest bit was making sure everything was straight and level. I'm still not 100% sure it is, but I think it has the desired effect.
I drilled a hole with my set of whole drillers bought from Aldi two years ago at a ridiculously low price, but which did the job admirably. It was my old drill that let me down, catching fire halfway through drilling. I've had it for many years and luckily had another one to hand to complete the job.
As you will see from the photo's, the whole has now been taken up with the chimney for the oven.
The hardest bit, and the bit I was really dreading is finishing off the oven inside, and making sure that all the bricks were sealed so that no excess heat or flames would burn through the bricks. This took longer than I had anticipated, the hardest bit being the top of the inner dome which couldn't be reached prior to sealing it off with bricks. It meant I had to fall back on my younger years contortionist moves to get partially inside the oven. I lit it with a car inspection lamp, which shows up any missing areas of fire cement very well.
However, that has now been completed, and I'm pleased with the result.
There's just a little tidying up to do around the oven and it will be finished.
The silver cabinet on the left is a food smoker which I have incorporated into the build. As yet I'm undecided what will go on top of it, but I suspect it will be a piece of slate or something similar.


Getting really excited now....
I spent one day building the outer dome out of a combination of whole and half bricks. Much easier when you've got something to work against like the inner dome.
The following day I spent pointing....roughly....in fact very roughly to give it that weatherd, lived in look. The hardest bit was making sure everything was straight and level. I'm still not 100% sure it is, but I think it has the desired effect.
I drilled a hole with my set of whole drillers bought from Aldi two years ago at a ridiculously low price, but which did the job admirably. It was my old drill that let me down, catching fire halfway through drilling. I've had it for many years and luckily had another one to hand to complete the job.
As you will see from the photo's, the whole has now been taken up with the chimney for the oven.
The hardest bit, and the bit I was really dreading is finishing off the oven inside, and making sure that all the bricks were sealed so that no excess heat or flames would burn through the bricks. This took longer than I had anticipated, the hardest bit being the top of the inner dome which couldn't be reached prior to sealing it off with bricks. It meant I had to fall back on my younger years contortionist moves to get partially inside the oven. I lit it with a car inspection lamp, which shows up any missing areas of fire cement very well.
However, that has now been completed, and I'm pleased with the result.
There's just a little tidying up to do around the oven and it will be finished.
The silver cabinet on the left is a food smoker which I have incorporated into the build. As yet I'm undecided what will go on top of it, but I suspect it will be a piece of slate or something similar.
Sasha inspecting my handy work...she doesn't seem to impressed!!
Me trying to wedge my way into the oven to point the top of the inner dome
It's beginning to look more finished now
The interior still needs tidying up
View of the rear of the dome
Closer view
Comments
Post a Comment